
Tag Archives: linux
Improved Jailed SFTP Creator for Web Server
So I decided to give this idea an overhaul after I was asked to find a way to create these accounts from PHP in the web server
I definitely would not go as far to say that I regard myself as a programmer, so there are probably things I’ve done in the script below that would make a veteran programmer cringe, but this is a massive improvement from the way it was as well as it really only being designed for my own usage.
The other new main requirement is that Apache can write to the new user’s SFTP directory so they can upload data, and get reporting on their services.
Because of security concerns it was decided that it wouldn’t be wise to allow a PHP script to be executing shell commands from the web server as root no matter how we went about it so the idea for the changes here are in relation to the next version creating a cron job to run the shell commands independently.
So the idea here is that there is a PHP script that when required will generate a simple file with the new username and password, and there will be a cron job running every few minutes looking for that file.
If there is the request to add a public key, this will search for it and add it as well.
It also generates an output file which contains the information for the new account, along with the bottom 5 lines of /var/log/secure to confirm that the permissions were applied correctly.
As said in previous post on the matter you must have your sshd_config setup as so:
Prerequisites:
OpenSSH 5 (I had to upgrade OpenSSH manually because CentOS 5 natively supports a previous version that wouldn’t suffice for this purpose).
…if by chance you need to do the same on CentOS or another RPM distro that has the same limitation, follow the installation instructions in this guide:
Installing OpenSSH 5 in CentOS 5
Add group SFTP:
In the script below I added, but haven’t yet tested a few lines which checks to see if group exists and creates it but it’s not enabled by default. Otherwise simply run this command.
# groupadd sftponly
Configuring:
Locate your sshd_config file and open with your desired text editor.
Locate out the following line and comment out with a # if not already done so:
# Subsystem sftp /usr/libexec/openssh/sftp-server
Scroll down and append the following to the end:
Subsystem sftp internal-sftp
Match Group sftponly
ChrootDirectory /home/%u
ForceCommand internal-sftp
AllowTcpForwarding no
The script:
Change the paths for lusername, pubkey & output file
#!/bin/bash
## Creates user and necessary SFTP directory permissions
## Refined Version 16th June 2014 --Chris. Tested CentOS 5+6
## Change file paths edit in getPaths function to suit:
## *lusername:
## *pubkey:
## *outputFilePath:
## Note: Pre-Configuration for group sftponly in sshd_config
## for SFTP is necessary.
isRoot() {
    # Check if the current user is root or not !
    if [ $EUID = 0 ]; then
        return 0
    else
        return 1
    fi
}
getPaths() {
    lusername="/var/www/html/newsftp"
    outputFilePath="/home/admin/"
    pubkey="/var/www/html/newsftpkey"
    hostName=$(hostname)
}
findUsername() {
##path to user data file in format <username> <password>

    findUserPass=$(find $lusername)
    if [[ $findUserPass == $lusername ]]
    then
            echo "found username file"
    else
            echo "no username file match" && exit
    fi
}
checkSFTPonly() {
    mksftpGrp=$(cat /etc/group | grep sftponly | sed s/:/" "/g | awk '{print $1}')
    mksftpTrue=$(echo "sftponly")
    if [[ $mksftpGrp == $mksftpTrue ]]; then
        echo "group exists!"; else
        echo "group doesn't exist!"; /usr/sbin/groupadd sftponly;
        echo "group sftponly created"; fi
}

outputKeys() {
    outputFile="$outputFilePath"/"$user"_sftp
    echo "Your SFTP account details are: " >> $outputFile
    echo "Username: "$user"" >> $outputFile
    echo "Password: "$pass"" >> $outputFile
    echo "Directory for files: /sftp" >> $outputFile
    echo "Port: 222" >>  $outputFile
    echo "Example: sftp -oPort=222 "$user"@"$hostName":/sftp" >> $outputFile
    echo "Looking for public key in path "$pubkey""

    ##If pubkey is found at path it adds to .ssh/authorized_keys
    findPubkey=$(find "$pubkey")
    if [[ $findPubkey == $pubkey ]]
    then
            echo "pubkey found - adding to authorized_keys..";
            cat $pubkey  >> "/home/"$user"/.ssh/authorized_keys";
    else
            echo "pubkey not found - you will have to add manually" | tee -a $outputFile; exit
    fi
    ##Adds lines spacing to Account Info Output
    echo -e "Public key added to authorized_keys: " >> $outputFile;
    sed -i '0~1 a\ ' $outputFile;
    echo -e "$pub \n" >> $outputFile;
    echo -e "Log output to confirm\debug: \n"

    ##Copies Secure Log output lines CentOS\RHEL only!
    tail -5 /var/log/secure | tee -a $outputFile;
    echo -e "\n Account info can be found at $outputFile";
    mv $lusername /home/admin/sftp_"$user"
    mv $pubkey /home/admin/"$user"_key

}

assignUserPass() {
    pub=$(cat $pubkey)
    echo $pub
    ##Get user and pass variables
    getUserPass=$(cat "$lusername")
    user=$(echo $getUserPass | awk '{ print $1 }')
    pass=$(echo $getUserPass | awk '{ print $2 }')
    echo $user $pass
    ##Add user
    echo "creating account for "$user"..."
    /usr/sbin/useradd -m "$user" -p "$pass"
    ##Add to group 'sftponly'
    /usr/sbin/usermod -G sftponly $user
    ##Strip account of shell priv.
    /usr/sbin/usermod -s /bin/false $user
    ##Change owner ~/ directory to root
    chown root:root /home/$user
    ##Jail the user folder
    chmod 755 /home/$user/
    chmod 755 /home/$user
    ##Create directory for file transfers
    mkdir /home/$user/sftp
    echo "/home/"$user"/sftp directory created"
    ##Give user ownership sftponly group ownership
    chown $user:sftponly /home/$user/sftp
    ##Allow sftponly group to write and enable Apache to write to directory
    /usr/sbin/usermod -aG apache sftponly
    chmod g+w /home/$user/sftp
    ##Make and lock down .ssh directory & authorised keys file
    mkdir /home/$user/.ssh/
    touch /home/$user/.ssh/authorized_keys
    chown $user:$user /home/$user/.ssh
    chmod 700 /home/$user/.ssh/
    chmod 700 /home/$user/.ssh
    chown $user:$user /home/$user/.ssh/authorized_keys
    chmod 600 /home/$user/.ssh/authorized_keys
}

if [ isRoot = 0 ];
then
    echo "Not root. Exiting.." && exit
else
	    getPaths;findUsername;checkSFTPonly;assignUserPass;outputKeys
fi
Linux Script to Enable Randomization of MAC Address on Startup
Linux Script to Enable Randomization of MAC Address on Startup
Made up this little thing for use on Debian\Ubuntu based systems in order to spoof the address for wlan0 to a different address every start up.
So whether you’re trying to preserve anonymity by installing it on a device that you use a lot on public networks, or cover your tracks in the snow when up to mischief by putting it on your Kali install, it is pretty handy.
Worth to note that it’s probably not a wise idea to assign this to an interface that you use static IP addressing for as you’d have to change your MAC in the router settings every start up, in which case it’s better to create a fake MAC address and make it set it to that every start up instead of randomizing by changing:
macchanger -r wlan0 —to–> macchanger –mac=XX:XX:XX:XX:XX:XX wlan0
To enable for other devices besides wlan0 just uncomment out the lines corresponding to your desired NIC in the part of the script as follows:
Instructions:
- Copy script and save as macchanger.sh to your home directory.
- Open up a terminal. Mark file as executable:
sudo chmod +x macchanger.sh - Simply run as root:
sudo bash macchanger.sh
To temporarily disable MAC address to default:
sudo macchanger -p wlan0
To revert permanently:
sudo update-rc.d macchangerstartup
sudo rm /etc/init.d/macchangerstartup
HOW TO: Using SSH with Deluge to add torrents on Ubuntu desktop\server remotely (incl. from Android devices)
The torrent client Deluge is reasonably well known, but what you may not know is that it can be run as a daemon (deluged) and when running allows you to use deluge-console and add torrents via command line.
Why would one want to do such a thing you may ask?
Personally I prefer the simplicity of being able to do this via command line as typing a few commands on a keyboard and pasting a link is more comfortable and more efficient time wise.
Also for my Android devices once configured, all I need to do is open an app, tap to connect via SSH, type in my public key password and from there it literally takes two commands with a pasted URL to ensure the new GoT episode is ready for me when I walk through the door.
Configuring SSH:
You will need to set up SSH if you haven’t already. Instructions on how to do so can be found here.
You will also need to go into your router settings and enable port forwarding to your computer’s internal ip address and ssh port. This process will vary from router to router, so look up the documentation for your specific model.
For this you will also need to know your computer’s ip address.
To find out your internal ip address type in terminal:
- ifconfig

The area where highlighted indicates indicates the ip addressed to my wireless NIC. If you are connected by ethernet the ip address will show up under eth0 up the top.

When you log into your router to configure port forwarding, this is the ip address you will use. The default port for SSH is 22. Be sure to save you changes.
Next open up google and type in “ip address”. It will display your public ip address – write this down.
Once that’s all up and running the next step is to install deluge.
Installing Client:
Install the packages in terminal:
- sudo apt-get install deluge deluged deluge-console
To configure the client to your preferences you can do so using the normal GUI deluge client. Close afterwards.
Open up terminal again to start the daemon.
Run the command:
- deluged
Now when you next open up Deluge you be given a prompt requiring you to run in ‘classic mode’ – click apply and you will see this screen:
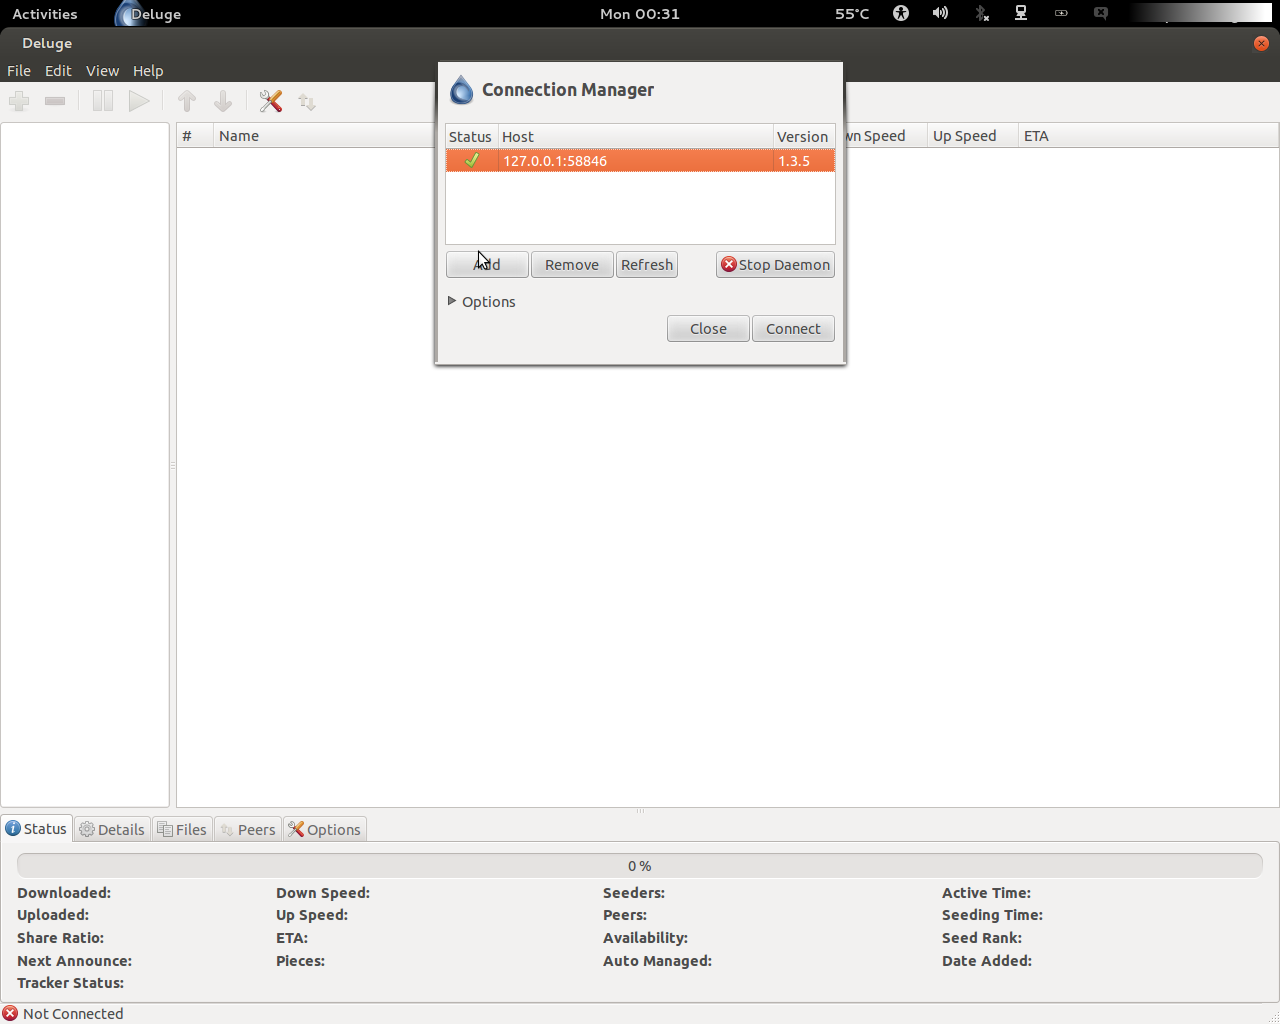
Click Connect and note that in the options tab you can configure it to connect automatically on start up.
Managing torrents remotely from another computer:
Both Linux and OSX allow you to use SSH from command line, however if you are using a Windows machine to connect remotely you will need to install the Putty SSH Client which you can get here.
Run the command:
- ssh <user>@<public ip address> -p <port>
Go through the authentication process, by default it just requires your user password unless you have set up RSA key authentication.
You should now be logged in to your account at home\wherever, enter the command:
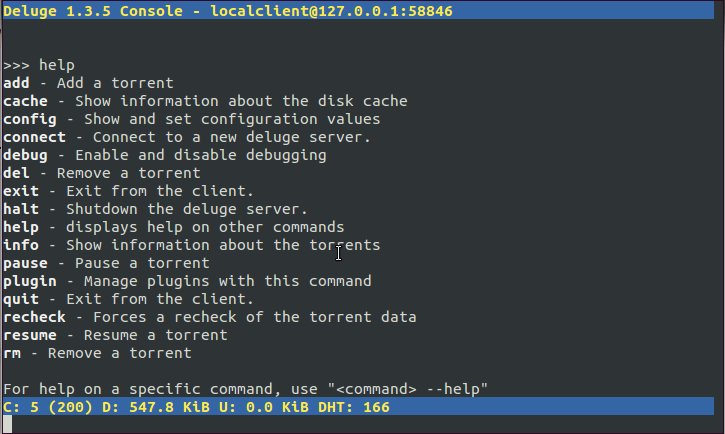
- deluge-console
If you receive an error message saying that you need to run the daemon, you can do this like previously by running ‘deluged’ again.
Once you have deluge-console running you can view a list of commands by typing ‘help’.
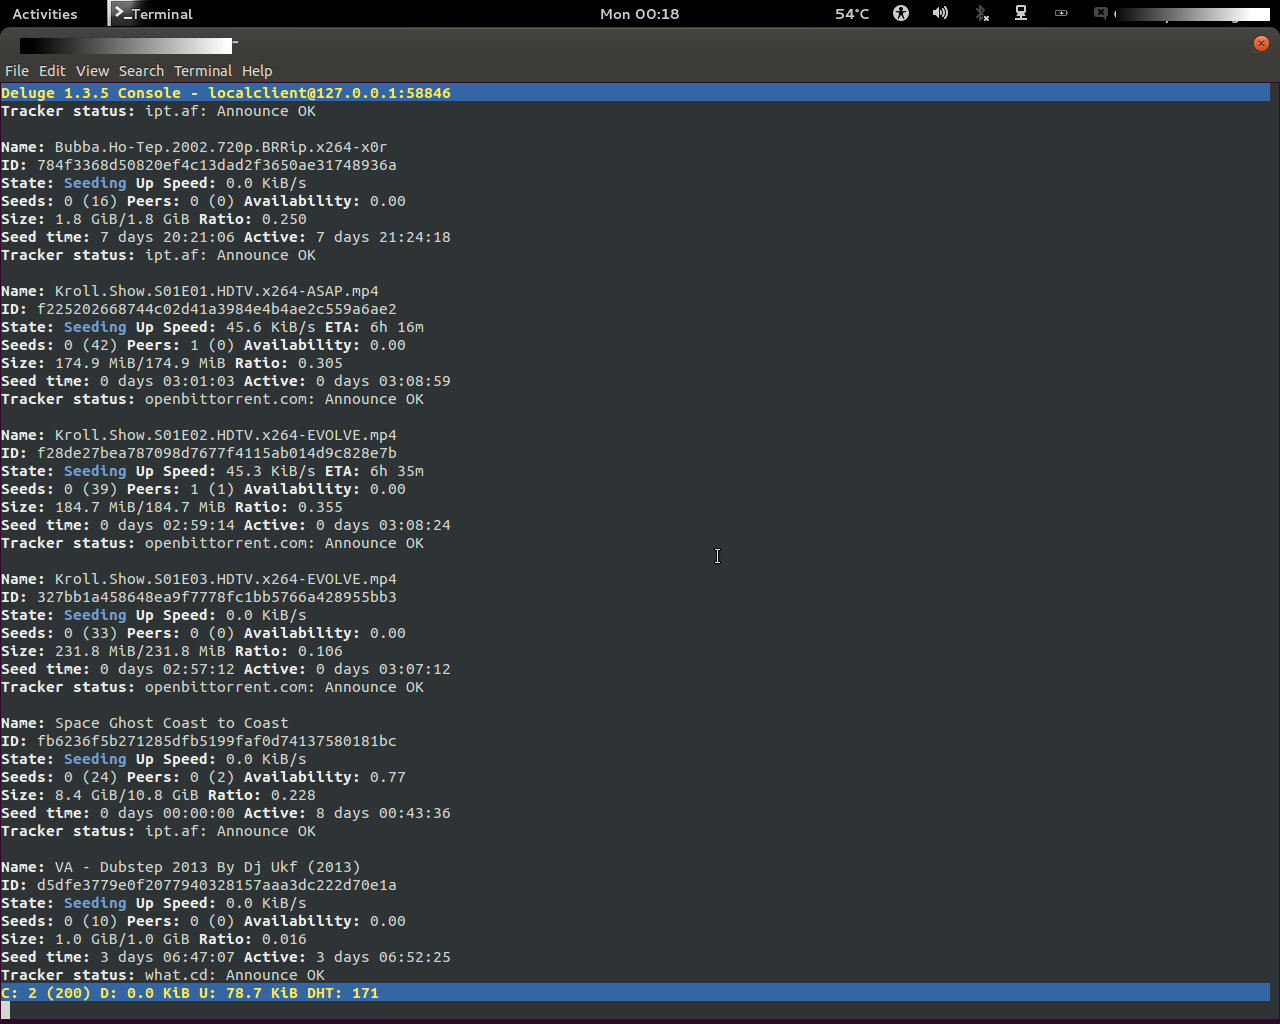
Adding a new torrent is as simple as looking up the torrent, copying the URL of the torrent file or magnet link, and pasting the link after the ‘add’ command as seen below.

To check on the download progress you can use the ‘info’ command to display active torrents.
Now you can quit and close the SSH session by simply typing exit, knowing Game of Thrones is going to be ready for you when you get home from work.
Connecting from Android device:
Simply download an SSH client for your device such as ConnectBot by entering <user>@<external ip>:<port> in the quick connect box seen in the bottom of the picture.
Once connected it will save your previous settings so next time you just need to tap to connect.
You also have the option of setting up public key verification for added security.

Connecting from iPhone, iPad:
Download whatever the f*** the main SSH client is for you weirdos and do exactly the same ;).
